

Elastic Compute Cloud (EC2)
Introduction
Section titled “Introduction”Elastic Compute Cloud (EC2) is a core service within Amazon Web Services (AWS) that provides scalable and flexible virtual computing resources. EC2 enables users to launch and manage virtual machines, referred to as instances.
LocalStack allows you to use the EC2 APIs in your local environment to create and manage EC2 instances and related resources such as VPCs, EBS volumes, etc. The list of supported APIs can be found on the API Coverage section.
Getting started
Section titled “Getting started”This guide is designed for users new to EC2 and assumes basic knowledge of the AWS CLI and our awslocal wrapper script.
We will demonstrate how to create an EC2 instance that runs a simple Python web server.
LocalStack for AWS running on a Linux host is required as network access to containers is not possible on macOS.
Start your LocalStack container using your preferred method.
Create or import a key pair
Section titled “Create or import a key pair”Key pairs are SSH public key/private key combinations that are used to log in to created instances.
To create a key pair, you can use the CreateKeyPair API.
Run the following command to create the key pair and pipe the output to a file named key.pem:
awslocal ec2 create-key-pair \ --key-name my-key \ --query 'KeyMaterial' \ --output text | tee key.pemYou may need to assign necessary permissions to the key files for security reasons. This can be done using the following commands:
chmod 400 key.pem$acl = Get-Acl -Path "key.pem"$fileSystemAccessRule = New-Object System.Security.AccessControl.FileSystemAccessRule("$env:username", "Read", "Allow")$acl.SetAccessRule($fileSystemAccessRule)$acl.SetAccessRuleProtection($true, $false)Set-Acl -Path "key.pem" -AclObject $aclicacls.exe key.pem /reseticacls.exe key.pem /grant:r "$($env:username):(r)"icacls.exe key.pem /inheritance:rIf you already have an SSH public key that you wish to use, such as the one located in your home directory at ~/.ssh/id_rsa.pub, you can import it instead.
awslocal ec2 import-key-pair --key-name my-key --public-key-material "$(cat ~/.ssh/id_rsa.pub)"If you only have the SSH private key, a public key can be generated using the following command, and then imported:
ssh-keygen -y -f id_rsa > id_rsa.pubAdd rules to your security group
Section titled “Add rules to your security group”Currently, LocalStack only supports the default security group.
You can add rules to the security group using the AuthorizeSecurityGroupIngress API.
Run the following command to add a rule to allow inbound traffic on port 8000:
awslocal ec2 authorize-security-group-ingress \ --group-id default \ --protocol tcp \ --port 8000 \ --cidr 0.0.0.0/0The above command will enable rules in the security group to allow incoming traffic from your local machine on port 8000 of an emulated EC2 instance.
Run an EC2 instance
Section titled “Run an EC2 instance”You can fetch the Security Group ID using the DescribeSecurityGroups API.
Run the following command to fetch the Security Group ID:
awslocal ec2 describe-security-groups{ "SecurityGroups": [ { "Description": "default VPC security group", "GroupName": "default", ... "OwnerId": "000000000000", "GroupId": "sg-0372ee3c519883079", ... } ]}To start your Python Web Server in your locally emulated EC2 instance, you can use the following user script by saving it to a file named user_script.sh:
#!/bin/bash -xeu
apt updateapt install python3 -ypython3 -m http.server 8000
You can now run an EC2 instance using the RunInstances API.
Run the following command to run an EC2 instance by adding the appropriate Security Group ID that we fetched in the previous step:
awslocal ec2 run-instances \ --image-id ami-df5de72bdb3b \ --count 1 \ --instance-type t3.nano \ --key-name my-key \ --security-group-ids '<SECURITY_GROUP_ID>' \ --user-data file://./user_script.shTest the Python web server
Section titled “Test the Python web server”You can now open the LocalStack logs to find the IP address of the locally emulated EC2 instance. Run the following command to open the LocalStack logs:
localstack logs2023-08-16T17:18:29.702 INFO --- [ asgi_gw_0] l.s.ec2.vmmanager.docker : Instance i-b07acefd77a3c415f will be accessible via SSH at: 127.0.0.1:12862, 172.17.0.4:222023-08-16T17:18:29.702 INFO --- [ asgi_gw_0] l.s.ec2.vmmanager.docker : Instance i-b07acefd77a3c415f port mappings (container -> host): {'8000/tcp': 29043, '22/tcp': 12862}You can now use the IP address to test the Python Web Server. Run the following command to test the Python Web Server:
curl 172.17.0.4:8000# Or, you can runcurl 127.0.0.1:29043<!DOCTYPE HTML PUBLIC "-//W3C//DTD HTML 4.01//EN" "http://www.w3.org/TR/html4/strict.dtd"><html><head><meta http-equiv="Content-Type" content="text/html; charset=utf-8"><title>Directory listing for /</title>...Connecting via SSH
Section titled “Connecting via SSH”You can also set up an SSH connection to the locally emulated EC2 instance using the instance IP address.
This section assumes that you have created or imported an SSH key pair named my-key.
When running the EC2 instance, make sure to pass the --key-name parameter to the command:
awslocal ec2 run-instances --key-name my-key ...Once the instance is up and running, we can use the ssh command to set up an SSH connection.
Assuming the instance is available under 127.0.0.1:12862 (as per the LocalStack log output), use this command:
ssh -p 12862 -i key.pem root@127.0.0.1VM Managers
Section titled “VM Managers”LocalStack EC2 supports multiple methods to simulate the EC2 service. All tiers support the mock/CRUD capability. For advanced setups, LocalStack for AWS comes with emulation capability for certain resource types so that they behave more closely like AWS.
The underlying method for this can be controlled using the EC2_VM_MANAGER configuration option.
You may choose between plain mocked resources, containerized emulation, or the Kubernetes executor.
Mock VM Manager
Section titled “Mock VM Manager”With the Mock VM manager, all resources are stored as in-memory representation. This only offers the CRUD capability.
To use this VM manager in LocalStack for AWS, set EC2_VM_MANAGER to mock.
This serves as the fallback manager if an operation is not implemented in other VM managers.
Docker VM Manager
Section titled “Docker VM Manager”LocalStack for AWS supports the Docker VM manager which uses the Docker Engine to emulate EC2 instances.
This VM manager requires the Docker socket from the host machine to be mounted inside the LocalStack container at /var/run/docker.sock.
This is the default VM manager in LocalStack for AWS.
You may set EC2_VM_MANAGER to docker to explicitly use this VM manager.
All launched EC2 instances have the Docker socket mounted inside them at /var/run/docker.sock to make Docker-in-Docker usecases possible.
All limitations associated with containers are also applicable to EC2 instances managed by the Docker manager. These restrictions include things like root access and networking.
Please note that this VM manager does not fully support persistence. While the records of resources will be persisted, the instances or AMIs themselves (i.e. Docker containers and Docker images) will not be persisted.
Docker base images which are tagged with the scheme localstack-ec2/<AmiName>:<AmiId> are recognized as Amazon Machine Images (AMIs).
These can be used to launch EC2 instances which are in fact Docker containers.
You can mark any Docker base image as AMI using the below command:
docker tag ubuntu:focal localstack-ec2/ubuntu-focal-ami:ami-000001The above example will make LocalStack treat the ubuntu:focal Docker image as an AMI with name ubuntu-focal-ami and ID ami-000001.
At startup, LocalStack downloads the following AMIs that can be used to launch Dockerized instances.
- Ubuntu 22.04:
ami-df5de72bdb3b - Amazon Linux 2023:
ami-024f768332f0 - Amazon Linux 2:
ami-07b643b5e45e
All LocalStack-managed Docker AMIs bear the resource tag ec2_vm_manager:docker.
These can be listed using:
awslocal ec2 describe-images \ --filters Name=tag:ec2_vm_manager,Values=dockerAWS does not provide an API to download AMIs which prevents the use of real AWS AMIs on LocalStack. However, in certain cases it may be possible to tweak your workflow to make it work with Localstack.
For example, you can use Packer to customise the Amazon Linux AMI on AWS. Packer can be made to use the Docker builder instead of the Amazon builder and add the customisations on top of the Amazon Linux Docker base image. The final image then can be used by LocalStack EC2 as illustrated above.
Instances
Section titled “Instances”When RunInstances is invoked, LocalStack creates an underlying Docker container to simulate an instance.
Docker containers that back EC2 instances have the naming scheme localstack-ec2.<InstanceId>.
LocalStack EC2 supports execution of user data scripts when the instance starts.
A shell script can be passed to the UserData argument of RunInstances.
Alternatively, the user data may also be added using the ModifyInstanceAttribute operation.
The user data is placed at /var/lib/cloud/instances/<InstanceId>/ in the container.
The execution log is generated at /var/log/cloud-init-output.log in the container.
Networking
Section titled “Networking”Network addresses for Dockerized instances are allocated by the Docker daemon and can be obtained from the PublicIpAddress attribute.
These addresses are also printed in the logs while the instance is being initialized.
2022-03-21T14:46:49.540 INFO Instance i-1d6327abf04e31be6 will be accessible via SSH at: 127.0.0.1:55705When instances are launched, LocalStack attempts to start SSH server /usr/sbin/sshd in the Docker base image.
If not found, it installs and starts the Dropbear SSH server.
To be able to access the instance at additional ports from the host system, you can modify the default security group and include the required ingress ports.
The system supports up to 32 ingress ports. This constraint is in place to prevent exhausting free ports on the host.
awslocal ec2 authorize-security-group-ingress \  --group-id default \  --protocol tcp \  --port 8080
awslocal ec2 describe-security-groups --group-names default
The port mapping details are provided in the logs when the instance starts up.
2022-12-20T19:43:44.544 INFO Instance i-1d6327abf04e31be6 port mappings (container -> host): {'8080/tcp': 51747, '22/tcp': 55705}Elastic Block Store
Section titled “Elastic Block Store”A common use case is to attach an EBS block device to an EC2 instance, which can then be used to create a custom filesystem for additional storage. This section illustrates how this functionality can be achieved with EC2 Docker instances in LocalStack.
First, we create a user data script init.sh which creates an ext3 file system on the block device /ebs-dev/sda1 and mounts it under /ebs-mounted:
cat > init.sh <<EOF#!/bin/bash
set -eomkdir -p /ebs-mountedmkfs -t ext3 /ebs-dev/sda1mount -o loop /ebs-dev/sda1 /ebs-mountedtouch /ebs-mounted/my-test-fileEOF
We can then start an EC2 instance, specifying a block device mapping under the device name /ebs-dev/sda1, and pointing to our init.sh user data script:
awslocal ec2 run-instances --image-id ami-ff0fea8310f3 --count 1 --instance-type t3.nano \ --block-device-mapping '{"DeviceName":"/ebs-dev/sda1","Ebs":{"VolumeSize":10}}' \ --user-data file://init.shPlease note that, whereas real AWS uses GiB for volume sizes, LocalStack uses MiB as the unit for VolumeSize in the command above (to avoid creating huge files locally).
Also, by default block device images are limited to 1 GiB in size, but this can be customized by setting the EC2_EBS_MAX_VOLUME_SIZE config variable (defaults to 1000).
Once the instance is successfully started and initialized, we can first determine the container ID via docker ps, and then list the contents of the mounted filesystem /ebs-mounted, which should contain our test file named my-test-file:
docker psCONTAINER ID IMAGE PORTS NAMES5c60cf72d84a ...:ami-ff0fea8310f3 19419->22/tcp localstack-ec2...You can then list the contents of the mounted filesystem /ebs-mounted, which should contain our test file named my-test-file:
docker exec 5c60cf72d84a ls /ebs-mountedmy-test-fileInstance Metadata Service
Section titled “Instance Metadata Service”The Docker VM manager supports the Instance Metadata Service which provides information about the running instance.
Both IMDSv1 and IMDSv2 can be used.
LocalStack does not strictly enforce either versions.
If the X-aws-ec2-metadata-token header is present, LocalStack will use IMDSv2, otherwise it will fall back to IMDSv1.
To create an IMDSv2 token, run the following inside the EC2 container:
curl -X PUT "http://169.254.169.254/latest/api/token" -H "x-aws-ec2-metadata-token-ttl-seconds: 300"The token can be used in subsequent requests like so:
curl -H "x-aws-ec2-metadata-token: <TOKEN>" -v http://169.254.169.254/latest/meta-data/You can use the ModifyInstanceMetadataOptions API to change the metadata options of a running instance, for example to require IMDSv2.
Parameters that are omitted from the request retain their current value, matching AWS behavior.
Metadata Categories
Section titled “Metadata Categories”Currently a limited set of metadata categories are implemented. They are:
ami-idami-launch-indexinstance-idinstance-typelocal-hostnamelocal-ipv4public-hostnamepublic-ipv4
If you would like support for more metadata categories, please make a feature request on GitHub Discussion.
Configuration
Section titled “Configuration”You can use the EC2_DOCKER_FLAGS LocalStack configuration variable to pass supplementary flags to Docker during the initiation of containerized instances.
This allows for fine-tuned behaviours, for example, running containers in privileged mode using --privileged or specifying an alternate CPU platform with --platform.
Keep in mind that this will apply to all instances that are launched in the LocalStack session.
Operations
Section titled “Operations”The following table explains the emulated action for various API operations. Any operation not listed below will use the mock VM manager.
| Operation | Notes |
|---|---|
CreateImage |
Uses Docker commit to capture a snapshot of a running instance into a new AMI |
DescribeImages |
Retrieves a list of Docker images that can be used as AMIs |
DescribeInstances |
Describes both mocked and Docker-backed instances. Docker-backed instances are marked with the resource tag ec2_vm_manager:docker |
RunInstances |
Creates and runs Docker containers that back instances |
StopInstances |
Pauses the Docker containers that back instances |
StartInstances |
Resumes the Docker containers that back instances |
TerminateInstances |
Stops the Docker containers that back instances |
CreateFleet |
Spawns Docker containers or Kubernetes pods to fulfill fleet capacity requests. Supports On-Demand, Spot, and mixed fleets. |
DeleteFleets |
Stops and removes the underlying containers or pods when TerminateInstances is set to true. |
IAM Condition Keys
Section titled “IAM Condition Keys”When IAM Policy Enforcement is enabled, LocalStack supports the following EC2-specific condition keys, matching the behavior described in the AWS condition keys reference:
ec2:MetadataHttpTokens— theHttpTokensvalue of an instance’s metadata options, useful for enforcing IMDSv2.ec2:Attribute/<AttributeName>— exposes request parameters (e.g.HttpTokensonModifyInstanceMetadataOptions) as condition keys.
For example, the following policy statement only allows launching instances when IMDSv2 is required:
{ "Effect": "Allow", "Action": "ec2:RunInstances", "Resource": "arn:aws:ec2:*:*:instance/*", "Condition": { "StringEquals": { "ec2:MetadataHttpTokens": "required" } }}Resource Browser
Section titled “Resource Browser”The LocalStack Web Application provides a Resource Browser for managing EC2 instances. You can access the Resource Browser by opening the LocalStack Web Application in your browser, navigating to the Resources section, and then clicking on EC2 under the Compute section.
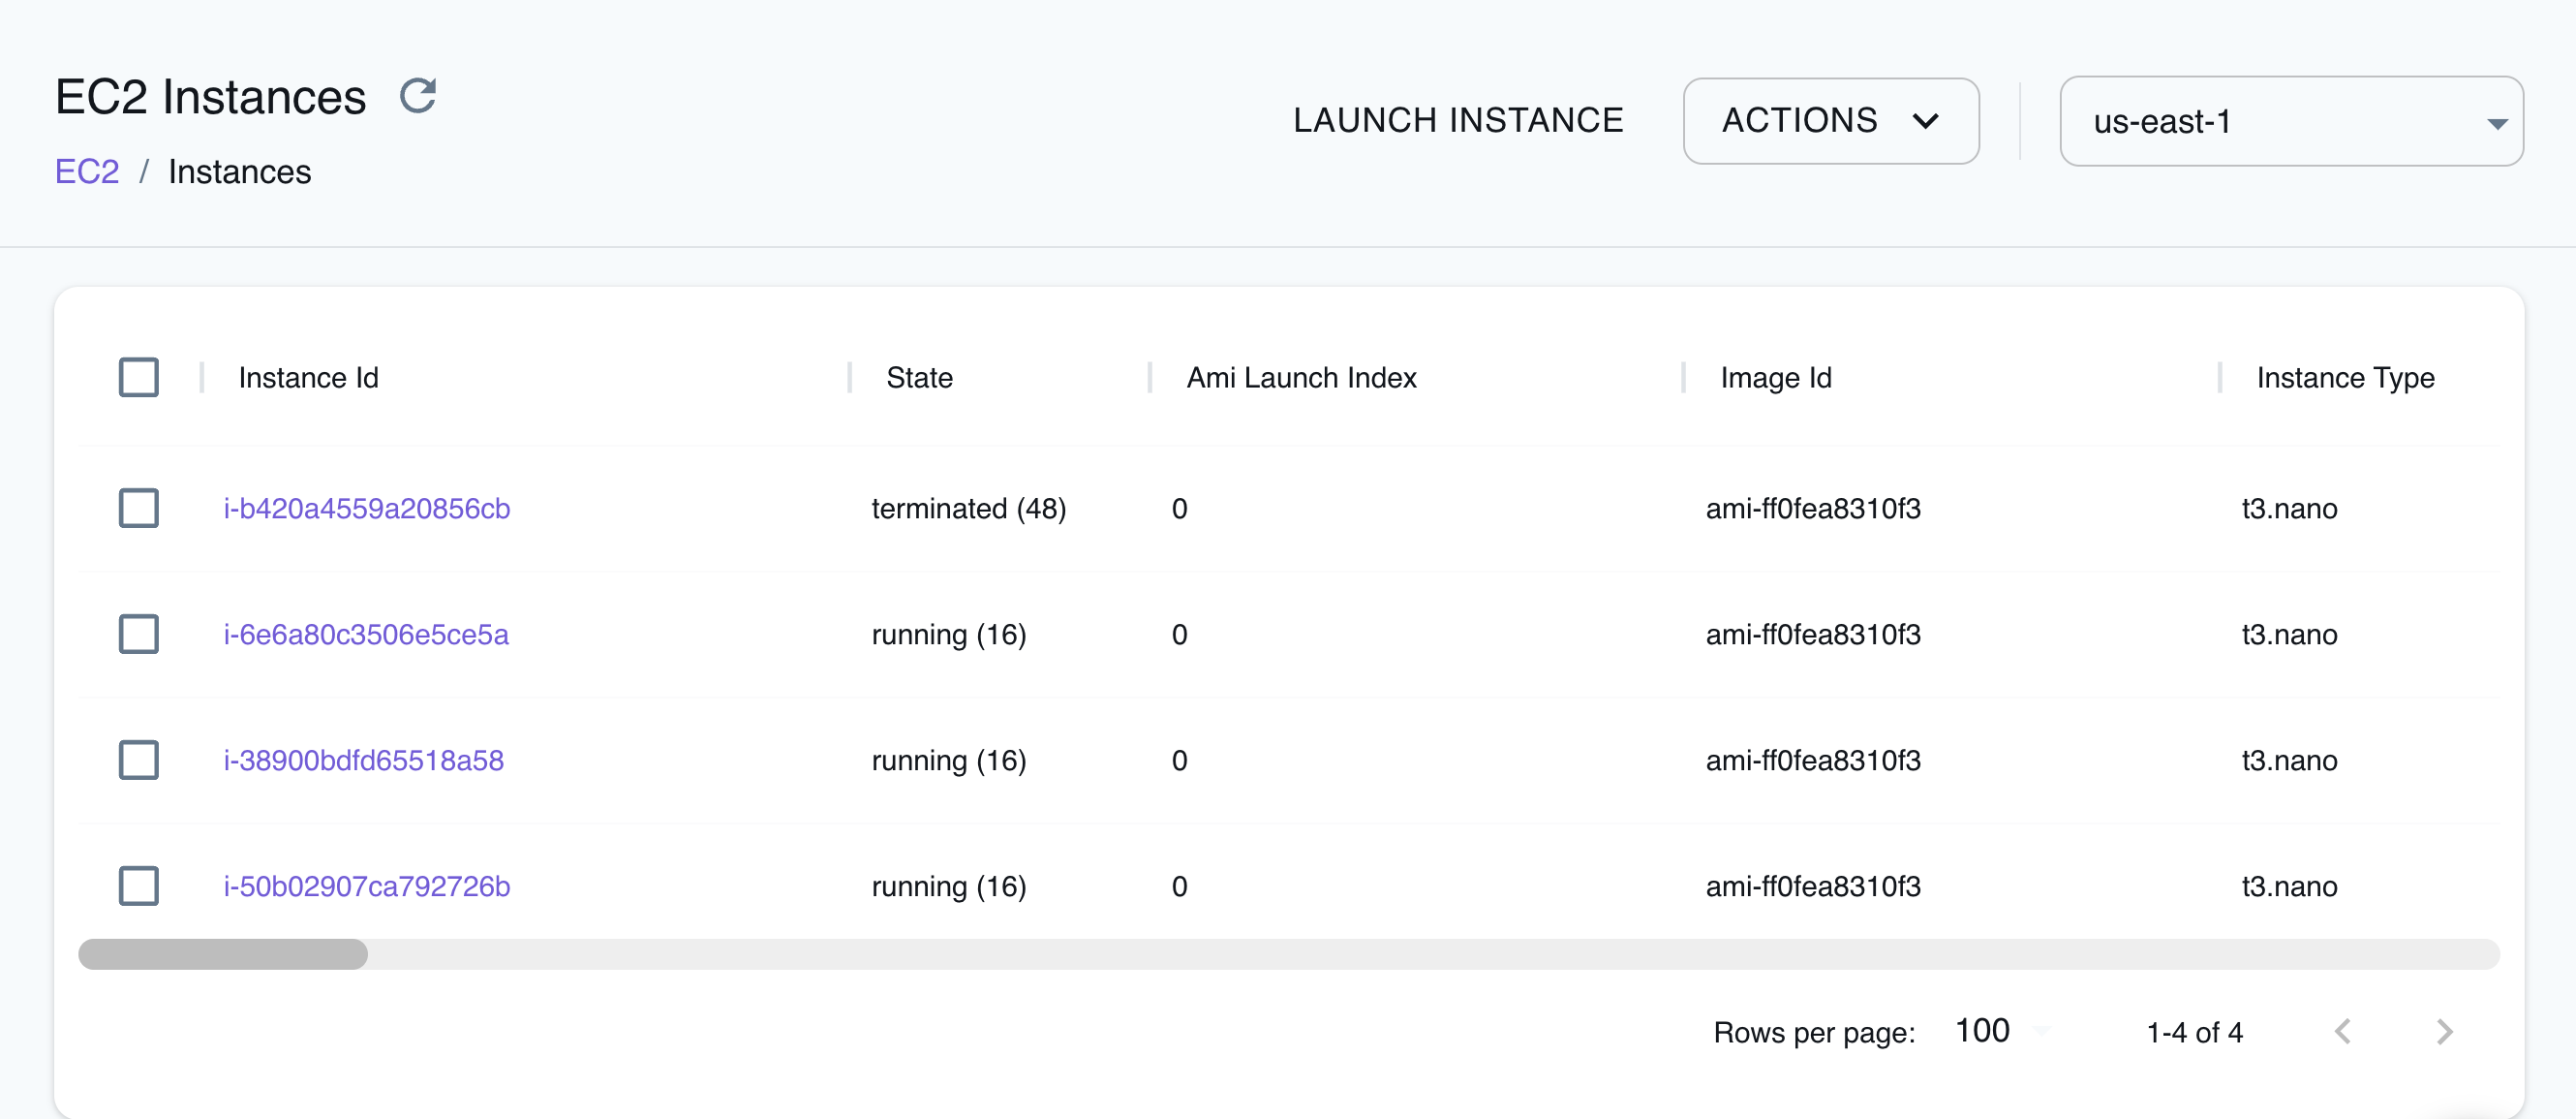
The Resource Browser allows you to perform the following actions:
- Create Instance: Create a new EC2 instance by clicking the Launch Instance button and specifying the AMI ID, instance type, and other parameters.
- View Instance: View the details of an EC2 instance by clicking on the Instance ID.
- Terminate Instance: Terminate an EC2 instance by selecting the Instance ID, and clicking on the ACTIONS button followed by clicking on Terminate Selected.
- Start Instance: Start a stopped EC2 instance by selecting the Instance ID, and clicking on the ACTIONS button followed by clicking on Start Selected.
- Stop Instance: Stop a running EC2 instance by selecting the Instance ID, and clicking on the ACTIONS button followed by clicking on Stop Selected.
API Coverage
Section titled “API Coverage”| Operation ▲ | Implemented ▼ | Verified on Kubernetes |
|---|